Introduction to Streamlit
Welcome back Data science enthusiasts.
I hope you enjoyed my last 2 article 1 and article 2. This is the part 3 of the article where we will create the Web app for the office room occupancy prediction model using Streamlit.
Streamlit is very easy to use and fast-growing ML framework for python in which you can easily create dashboards and deploy ML models. Few days back streamlit got a massive $35mn funding for the ML research and total of $62mn funding
How to Install Streamlit
pip install streamlit
for google colab or jupyter notebook !pip install streamlit
Lets import all the useful libraries
from pycaret.classification import load_model, predict_model

import streamlit as st

import pandas as pd

import numpy as np

import pickle

import six

import joblib

import sys

from datetime import datetime

import warnings

warnings.filterwarnings('ignore')

sys.modules['sklearn.externals.six'] = six
Load the model which we have created in the past using pycaret.
model = load_model('catboost classifier 17dec2020')
We Will create a user defined function named predict to take the model and user provided dataframe as an input.
def predict(model, input_df):

predictions_df = predict_model(estimator=model, data=input_df)

predictions = predictions_df['Label'][0]

return predictions
After that we will create our run function which will run our streamlit app.
def run():
from PIL import Image
image = Image.open('dsp3.jpeg')
image = image.resize((300,100))
image_meeting_room = Image.open('meeting room.JPG')
image_meeting_room = image_meeting_room.resize((300,100))
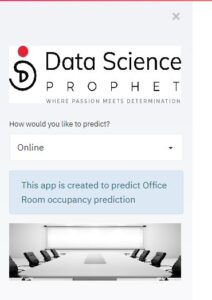
st.sidebar.image(image)
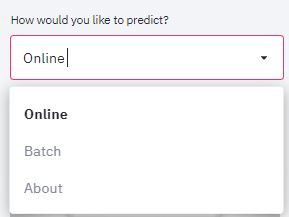
add_selectbox = st.sidebar.selectbox(
"How would you like to predict?",
("Online", "Batch","About"))
st.sidebar.info('This app is created to predict Office Room occupancy prediction')
st.sidebar.image(image_meeting_room)
st.title("Office Room occupancy prediction")
Above mentioned lines will create a sidebar of our streamlit app. We have added two images, app title and allowed user to select the method to use.
We have provided two options –
- Online- enter the data online within the app and get the result
- Batch- upload the data in a csv file and get the result on our app
- About – about provides us the information regarding the author
Once that part is completed, we will build code for the online and batch method with all the required calculations. Good thing about streamlit is, it allows us to take user input and do all the calculation and manipulation within the app.
if add_selectbox == 'Online':
#add_selectbox online will create calculation for the online mode
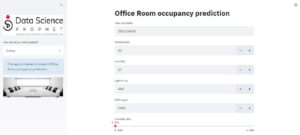
input_user = st.date_input('User input Date')
#date_input allows user to input a data from the app
user_year = input_user.year
user_month = input_user.month
user_day = input_user.day
user_weekend = input_user.weekday()
user_weekend1 = 1 if user_weekend > 5 else 0
above code will do basic feature engineering of the date input provided by the user
you can provide min_value , max_value and default values (value) with streamlit number_input that is an added advantage of streamlit.
user_temperature = st.number_input('Temperature', min_value=1, value=23)

user_humidity = st.number_input('Humidity', min_value=1, value=27)

user_light = st.number_input('Light in Lux', min_value=1, value=460)

user_co2 = st.number_input('CO2 in ppm', min_value=1, value=1040)

user_HumidityRatio = st.slider('Humidity ratio', min_value = 0.000, max_value = 1.000,step=0.001, value=0.004,format="%.3f")

output=""

output1=""
Now we will create a user defined dataframe
user_df_data = [[user_year,user_month,user_weekend1,user_day,user_temperature,user_humidity,user_light,user_co2,user_HumidityRatio]]
we will add our custom column names which matches with our model column names
user_df_colnames = ["Year","Month","weekend","day","Temperature","Humidity","Light","CO2","HumidityRatio"]

input_df = pd.DataFrame(user_df_data,columns = user_df_colnames)
st.button will add a new button inside online mode and once we click it will run the model and will provide you prediction on the page itself.
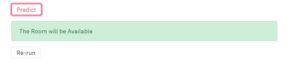
if st.button("Predict"):
output = predict(model=model, input_df=input_df)
output_dict = {1 : 'Occupied', 0 : 'Available'}
final_label = ""
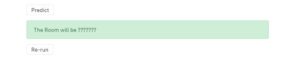
final_label = np.where(output == 1, 'Occupied',np.where(output == 0,"Available","???????"))
st.success(f'The Room will be {final_label}')
st.success allows us to provide a dynamic text output on the predict screen.

Once online part is done we will create code for the batch process
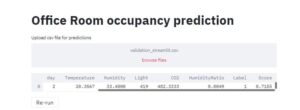
if add_selectbox == 'Batch':
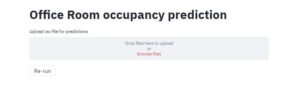
file_upload = st.file_uploader("Upload csv file for predictions", type=["csv"])
Streamlit allows user to choose a file which is very similar to file.choose() in Rshiny. Here type “CSV” will only allows a CSV to be uploaded by the user.
if file_upload is not None:

data = pd.read_csv(file_upload)

predictions = predict_model(estimator=model,data=data)

st.write(predictions)
we will validate the file if it is not empty we will read it, run the pycaret model on it and it will provide the output on the screen itself in a table format.
if add_selectbox == 'About':

st.subheader("Built with Streamlit and Pycaret")

st.subheader("Hunaidkhan Pathan")

st.subheader("https://www.linkedin.com/in/hunaidkhan/")

st.button("Re-run")
I have added re run button hence a user can any time remove the entered data and refresh the app. Also if there are any changes in the file streamlit will know it and will give you a prompt on the right hand side

if __name__ == '__main__':

run()
Last we will check if the name is main and we will run function of the app.
How to run the app:
Go to the folder where app python file is saved
Open CMD in that folder
Type :- streamlit run app_streamlit.py (app_streamlit.py is the name I have given your filename can be different)
Once the app starts it will give you details about pycaret model load and all the transformations
App will open in your default browser automatically or you can goto http://localhost:8501/ and run the app in your favourite browser.
That is it your streamlit app is up and running in no time.
We can also create a website using streamlit and Heroku. I have build one website for income tax calculator using streamlit and Heroku – https://indiaincometaxcalculator.herokuapp.com/ ( India income tax calculator ITR-1)
If you want to know how to deploy the app on Heroku ping me on Linkedin, I will be happy to help you.
You can download the complete code from my github repo.
Have a nice day.

 11
11