Welcome back Data science enthusiasts.
I hope you enjoyed my last article. This is the part 2 of the article where we will deploy the Machine learning occupancy prediction model into production by creating a Rest API using Fastapi.
Why FASTAPI?
- Fast: Very high performance, on par with NodeJS and Go (thanks to Starlette and Pydantic). One of the fastest Python frameworks available.
- Fast to code: Increase the speed to develop features by about 200% to 300%. *
- Fewer bugs: Reduce about 40% of human (developer) induced errors. *
- Intuitive: Great editor support. Completion everywhere. Less time debugging.
- Easy: Designed to be easy to use and learn. Less time reading docs.
- Short: Minimize code duplication. Multiple features from each parameter declaration. Fewer bugs.
- Robust: Get production-ready code. With automatic interactive documentation.
- Standards-based: Based on (and fully compatible with) the open standards for APIs: OpenAPI (previously known as Swagger) and JSON Schema.
Why Fastapi is better than Flask?
- Under the hood, FastAPI uses Pydantic for data validation and Starlette for tooling, making it blazing fast compared to Flask, giving comparable performance to high-speed web APIs in Node or Go.
- Starlette + Uvicorn offers async capability, something that Flask lacks.
- With Pydantic along with type hints, you get a nice editor experience with autocompletion. You also get data validation, serialization and deserialization (for building an API), and automatic documentation (via JSON Schema and OpenAPI
- Fastapi has very awesome UI for testing the endpoint and requests with Swagger UI which is the best part of fastapi.
- Fastapi creates documentation with nice GUI with openapi and
Companies using Fastapi:-
Netflix
Microsoft
Uber
Spacy
Hug
Let’s Get back to the article :-
Installing fastapi –
we will need need an ASGI server for production
pip install fastapi uvicorn
Now you might have a question what is ASGI(Asynchronous Server Gateway Interface)?
In simple words ASGI can handle concurrent API requests for Python, earlier python was supporting WSGI(Web server Gateway Interface) which does not have capabilities of concurrent request or async and wait.
asyncio in your code is a major benefit for web programming. Instead of running 10 queries one after the other and waiting for each one to come back, you can run 10 queries at the same time, while hitting your cache and making an HTTP request simultaneously on a single thread
Flask uses WSGI server and for production we use gevent, eventlet, twisted or some other tools to make it fast by enabling multi-threading. Asyc is not supported by flask
Let’s get our hands dirty and get into coding part making our 1st Fastapi web service
## importing useful libraries ##
import uvicorn

from fastapi import FastAPI,Query

from fastapi.encoders import jsonable_encoder

from pydantic import BaseModel

from fastapi.responses import ORJSONResponse, JSONResponse

import os

import pandas as pd

import numpy as np

from pycaret.classification import *

from datetime import datetime

import pickle
We will load our Pycaret model which we have saved in our previous post. (Pycaret remembers all our transformation while saving the model)
model = load_model('catboost classifier 17dec2020')
### lets define our app ###
app = FastAPI(title="Office Occupancy prediction fast API",

description=”predicts the office room availability “,

version=”1.0″,default_response_class=ORJSONResponse)
Note :- here I have changed the default response to ORJSON which gives us the same output as flask. which we use jsonify(output) or df.to_json(orient=”records”)
Defining the routes or endpoints of our API
The check endpoint is just to check whether our API is running or not. ##
@app.post('/check')

async def index():

return {“text”:”Hello data science prophet Masters”}
Remember in Flask we have very similar way to define the route @app.route(“/”,methods=[‘POST’])
ML Aspect, now things are going to get a little complicated, but I will break it down for you.
I am using async for concurrent requests and also defining a predict function where I will get all the user requests.
@app.post('/')

async def predict(

enter_date:str =Query(…, description=”Enter Date in dd-mm-yyyy formate i.e. 01-02-2020 “,),

user_temperature: int =Query(…, description=”Enter Temperature in Celcius (ex- 23)”,),

user_humidity: int =Query(…, description=”Enter humidity in % (ex- 30)”,),

user_light: int =Query(…, description=”Enter light in LUX (ex- 460)”,),

user_co2: int =Query(…, description=”Enter CO2 in PPM (ex- 1067) “,),

user_HumidityRatio: float =Query(…, description=”Enter humidity ratio between 0 to 1 (ex- 0.04)”,)):
In Fastapi you can also specify the requested field type. Here I have defined user_temperature as int hence if a user by mistake sends any other type fastapi will throw an error.
Fastapi also provides this great feature of providing a description of the query parameters which makes it easier for the requester to know the parameter
Data preprocessing
# we will extract year, month,weekend,day of the month from the user provided date
datetime_object = datetime.strptime(enter_date, "%d-%m-%Y")

user_year = datetime_object.year

user_month = datetime_object.month

user_weekend = datetime_object.weekday()

user_day = datetime_object.day

user_weekend1 = 1 if user_weekend > 5 else 0
## From the data posted by user we will create a data frame which we will pass into our pycaret model.
user_df_data = [[user_year,user_month,user_weekend1,user_day,user_temperature,user_humidity,user_light,user_co2,user_HumidityRatio]]
## we will specify the same column names which is there in our pycaret model ##
user_df_colnames = [“Year”,”Month”,”weekend”,”day”,”Temperature”,”Humidity”,”Light”,”CO2″,”HumidityRatio”]

user_df = pd.DataFrame(user_df_data,columns = user_df_colnames)
predictions = predict_model(estimator=model,data=user_df) ##predict_model is the function in Pycaret to predict on the new data

print(predictions)
### predictions will be in numpy array hence we are converting the predictions to JSON object using predictions.to_dict() ### python dict and JSON have same structure ###
predictions1 = predictions.to_dict(‘records’)[0]

return(predictions1)
### Now Lets run the Code ###
Fire up your command prompt
Syntax to run fastapi app is :-
(uvicorn main:app –reload)
1st Uvicorn is the ASGI web service
2nd 1st part is one is your python script name : 2nd part is app (here app is what you have defined or named your fastapi app as)
3rd –reload is optional for debugging the code while in development. For the production instance remove this line
4th port – allocate a free port in your server where your app will be running.
Now type the below code in your cmd and app will start. You can see a good amount of speed difference compared to Flask.
uvicorn fastapi_occupancy_app:app --reload --port 1111
![]()
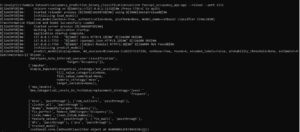
Open your browser and type http://127.0.0.1:1111/
Your application will be up and running
Unfortunately, you will get this error {“detail”:”Method Not Allowed”} because our browser sends a GET request and our API we have allowed only POST requests.
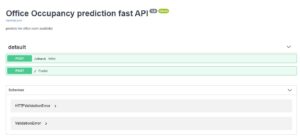
Here comes the interesting part go to http://127.0.0.1:1111/docs
Now you can see an awesome Swagger UI of your app, and you can see all the endpoints with which method is allowed to be used.
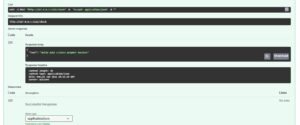
Go to Check end point and on the right-hand side there is a button Try it now. Click it, and you will get a response on the same page itself. You don’t need to use CURL or Postman to check your API. Swagger UI does the job for you with this docs endpoint in your API URL.

One good thing about Fastapi is it also provides you CURL request at the bottom of the page which you can query using CMD also.
If we go down to the 2nd endpoint Predict, which is our Machine learning endpoint.
You can see all the query with description hence it makes it easy to understand what the query parameter should be. Also, you can notice below the parameter it has clearly written expected data type. i.e. for user_temperature : int is the data type.
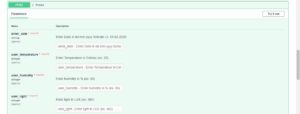
Let’s enter all the query parameters.
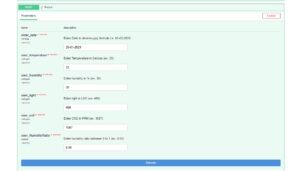
Once you have entered all the required parameters, Click on the execute button (Fastapi also have provision for optional query parameters)

You can see above the response was extremely fast, predicted label is 1 which means room will be occupied and confidence score is 97% which is provided by pycaret.
Using Postman
We will send a post request from our favorite Postman.
Postman query will look like this :- http://127.0.0.1:1111/?enter_date=20-02-2020&user_temperature=20&user_humidity=25&user_light=27&user_co2=490&user_HumidityRatio=0.003

Here’s how our query will work in postman.

Postman request output is provided above. You can see for this query parameters the prediction is 0 which means room will not be occupied.
CURL request
Sending a CURL request:-
To send curl request I prefer CMD which is simple and fast
Curl request will be :- curl -X POST "http://127.0.0.1:1111/?enter_date=20-03-2021&user_temperature=23&user_humidity=50&user_light=460&user_co2=1060&user_HumidityRatio=0.04" -H "accept: application/json" -d ""


Once we have sent a request, Fastapi is superfast to send the response.
Here you can see the output in json format and prediction is 1.
I hope you have enjoyed reading about this new python framework Fastapi( This was a long article but thanks for sparing some time). Fastapi has many awesome features which I can not highlight here but do follow official Fastapi page and its creator Sebastián Ramírez Montaño for more updates.
Complete code is available in my github repo
Wait there is more!!!!!!!!!!!!!!!!!!!!!!!!!!
In the next article, we will deploy the same model using Streamlit which is growing very fast for easily developing GUI for Machine learning models.
Stay tuned to Data science prophet for the next article.
References :-
https://testdriven.io/blog/moving-from-flask-to-fastapi
https://stackoverflow.com/questions/46386596/disadvantages-of-using-asgi-instead-of-wsgi
Thanks,
Hunaidkhan Pathan

 16
16
Leave a comment